The hard part of a SaaS demo is not making the interface move. It is proving that the product does what the narration says. If you want to create SaaS demo videos with AI motion graphics, start by treating every scene as evidence for one buyer question. An explainer video engine such as TapVid can help organize source material into motion, but animation should frame the proof rather than replace it.
That distinction matters because a polished demo can still be weak. A glowing cursor may point at a button, a chart may sweep onto the screen, and a voice may promise faster work. Yet the viewer may never see the action that creates the result. The video looks finished, but the claim remains unproven.
This guide presents a proof-first production method for SaaS marketers, founders, and product teams. It includes an evidence ladder, a readiness score, a seven-scene structure, and a two-pass approval process. Use it before you choose transitions or write a long voiceover.
Why motion is not the same as evidence?
Motion graphics help direct attention. They can isolate a field, trace a workflow, explain a relationship, or connect two interface states. Those jobs are useful. Trouble starts when motion invents the part the product was supposed to prove.
Imagine a reporting tool that claims to turn raw campaign data into a weekly client summary. A weak demo opens on a dashboard, adds animated arrows, then cuts to a beautiful report mockup. The viewer never sees a dataset selected, a report generated, or an output opened. The edit implies a causal step that the recording does not show.
A stronger demo makes the chain visible. It begins with the state the buyer recognizes, shows the user action, holds on the changed state, then states the boundary. If the report still needs review before it goes to a client, say so. A limitation that is named clearly often builds more trust than a dramatic transition.
The product image below comes from current first-party TapVid material. It shows scene timing, screen direction, and voiceover in adjacent columns, which supports only the narrow observation that these planning elements are visible together when you create SaaS demo videos with AI motion graphics. No documented TapVid test was completed for this article because the available browser session was signed out. The image is not presented as a first-person test result, and no generated output or timing claim is based on it.
Use motion graphics for four specific jobs:
- Focus attention on the interface element involved in the claim.
- Preserve context while moving between a starting state and a result.
- Explain a relationship that the interface alone cannot make clear.
- Keep labels, approved wording, and source visuals readable.
Do not use motion to hide loading states, imply an action that was never recorded, substitute an invented interface for a live product, or turn an estimate into an observed result.
How to create SaaS demo videos with AI motion graphics?
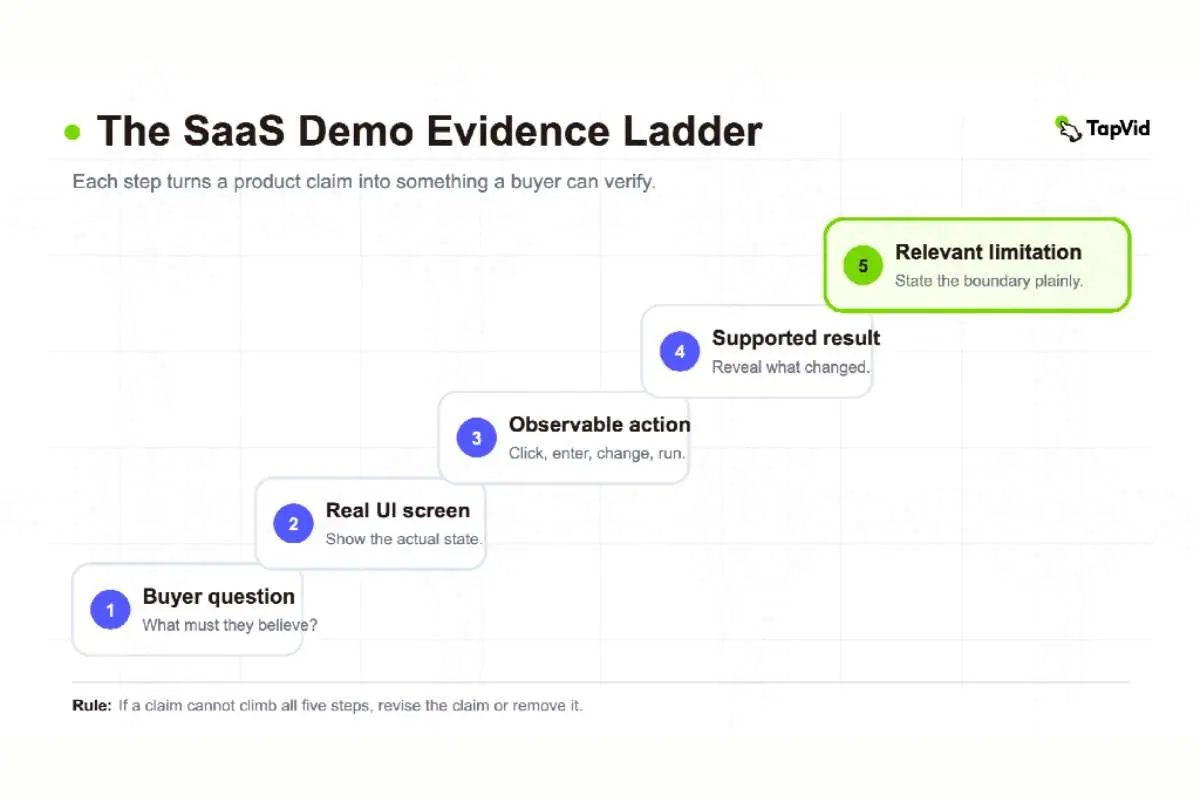
When you create SaaS demo videos with AI motion graphics, the SaaS Demo Evidence Ladder is a five-step test for each material claim. A scene is ready only when the claim can climb from a buyer question to an honest boundary.
1. Start with the buyer question
Write the question in the buyer’s language. Avoid internal feature names. “Does bulk export work?” is better than “Should we explain the export module?” The buyer question determines what the scene must prove.
One feature may answer several questions, but a single scene should answer one. If a workflow claims to save setup time and reduce errors, split those ideas unless the same observable action supports both.
2. Select the real interface screen
Choose the screen that contains the state needed to answer the question. A landing page illustration is not a substitute for the relevant product state. If the product is not ready to show publicly, decide whether the video is a concept teaser or a product demo. Label it accordingly.
Clean the environment before capture. Remove private records, confusing test names, stale notifications, and irrelevant browser chrome. Keep enough context for the viewer to understand where the action occurs. Cropping too tightly can make a real screen feel like a fabricated card.
3. Record an observable action
The action should be visible and specific: select a source, change a setting, run a command, approve a step, or open the result. Avoid a cursor that circles an area while the narration describes work happening elsewhere.
Write the narration after choosing the action. This keeps the words synchronized with what the viewer can verify. If the action takes longer than the scene can hold, record the start and the completed state, then label the time jump rather than hiding it with a mysterious cut.
4. Reveal a supported result
Hold the result long enough for the viewer to inspect it. The result may be a changed status, a generated asset, an updated record, or a completed workflow. The screen must support the words used in the voiceover.
Do not turn a product output into a business outcome without separate evidence. A dashboard that generates a report proves that the report exists. It does not prove that clients renew more often. Keep product proof and commercial claims in different evidence lanes.
5. State the relevant limitation
A boundary tells the buyer when the result applies. It may identify a required input, a plan dependency, a manual review step, or an unsupported edge case. Choose the limitation most likely to change the buyer’s decision.
You do not need to interrupt every scene with a disclaimer. Put the boundary where it affects interpretation. A short note such as “requires an approved data source” is more useful than a long legal paragraph at the end.
Score demo readiness before production
Teams lose time when they animate a workflow that is not ready to be demonstrated, especially when they create SaaS demo videos with AI motion graphics before validating the evidence. Use this 10-point scorecard before storyboarding. Score each row from 0 to 2.
| Readiness item | 0 points | 1 point | 2 points |
| Buyer question | Vague feature topic | Internal question | Clear buyer decision question |
| Interface state | No real screen | Partial or unstable screen | Real, clean, approved state |
| Observable action | Implied by narration | Partly visible | Fully visible and repeatable |
| Supported result | Mocked or unclear | Result visible with caveats | Result visibly follows the action |
| Boundary | Unknown | Known but not approved | Relevant limitation approved |
Use the total as a production gate:
- 9 to 10 points: ready to script and animate.
- 7 to 8 points: proceed only after naming the weak row and its owner.
- 0 to 6 points: stop production and repair the evidence chain.
The score is not a quality grade for the product. It measures whether this particular claim is ready for a public demo. A mature product can still receive a low score when the test account is messy or the approved result is unavailable.
For a multi-scene video, score every major claim separately. One strong feature should not hide an unsupported statement elsewhere in the script.
Use a seven-scene proof-first architecture
Once the evidence is ready, build the video around seven scene jobs. The structure is flexible enough for a short homepage explainer or a longer sales follow-up. Scene duration changes, but the evidence order stays stable.
Scene 1: The buyer’s current state
Open on the recognizable problem, not on a logo animation. Show the work as it exists before the product action. For a support analytics tool, that might be a queue of unresolved conversations rather than a generic image of a busy team.
The voiceover should name the decision context. Avoid a broad promise about changing the business. A useful opening makes the viewer think, “That is the task I need to fix.”
Scene 2: The exact input
Show what enters the workflow. It could be a file, a selected account, an approved script, or an existing record. Use real source assets when they are safe to publish.
This scene prevents a common credibility gap. If the video jumps straight to a result, the buyer cannot judge how much preparation the product required.
Scene 3: The key action
Show the smallest action that activates the value. Keep the cursor deliberate and keep motion around the focal element restrained. If several settings matter, reveal them in the order a user would encounter them.
Scene 4: The product’s intermediate state
Not every workflow moves directly from click to result. A review screen, progress state, or configuration step may be part of the product’s real value. Show it when it affects control or trust.
This is also where an explainer video can clarify what the interface is doing. A short label or motion path can connect the input to the process without pretending to expose hidden technical behavior.
Scene 5: The visible result
Pause on the changed state. Make the important difference easy to inspect. Use a before-and-after arrangement only when both frames come from comparable states.
Narration should describe the observed output, not jump to an unsupported promise. “The approved fields now appear in the client report” is inspectable. “Your team will never make a reporting mistake again” is not.
Scene 6: The boundary or control
Show how the user reviews, adjusts, or approves the result when the product supports that step. If the workflow requires a manual check, make that check part of the demo rather than hiding it.
The TapVid Studio screenshot shown earlier illustrates a useful review pattern. Time, screen direction, and voiceover appear in adjacent columns. Because that image comes from first-party product material rather than a run performed for this article, it proves only that these planning elements are visibly presented together.
Scene 7: The next buyer action
Close with one next step that matches the video’s purpose. A homepage demo may invite the viewer to try the workflow. A sales follow-up may point to a proof session using the buyer’s own data. An onboarding video may send the user to the exact setup step.
Avoid stacking several calls to action. The final scene should preserve the clarity built by the evidence sequence.
Match narration, interface action, and outcome
Before animation, create a three-column alignment sheet. Each row represents one scene.
| Narration | Interface evidence | Approval question |
| What the viewer hears | What the viewer can inspect | Does the screen support every important word? |
| What action is described | Cursor, selection, or state change | Is the action actually visible? |
| What result is claimed | Result screen or output | Is this a product result or an unproven business outcome? |
Read the narration without the video. Mark every noun, number, comparison, and outcome. Then watch the video without sound. For each marked statement, point to the frame that supports it.
If you cannot point to a frame, choose one response: add evidence, narrow the wording, or remove the claim. Do not solve the mismatch with faster cuts.
Motion timing should follow the proof. Let the interface settle before narration names the result. Avoid animating a callout before the underlying state appears. On a small screen, the viewer needs enough time to locate the object, observe the action, and read the outcome.
Review facts and visual quality separately

A single approval pass tends to favor the loudest feedback. Designers may focus on pacing while product managers correct terminology. The result can look better without becoming more accurate.
Run two separate passes.
Pass 1: Factual approval
Ask a product owner or subject expert to review the script and frames. They should verify:
- Product names, field labels, numbers, and stated limitations match approved sources.
- The screen shown belongs to the workflow described.
- Each action precedes the result attributed to it.
- Time jumps, mock data, and concept states are labeled.
- No customer or private information appears.
Freeze the factual copy after this pass. Any later wording change should return to the factual reviewer.
Pass 2: Visual approval
Ask the visual reviewer to evaluate focus, pacing, hierarchy, caption readability, and brand consistency. The reviewer may change crop, emphasis, spacing, or transition timing. They should not rewrite approved facts to make a line sound more dramatic.
Keeping the passes separate creates a clean change history. It also makes review faster because each person knows what they own.
A final approval checklist
Use this checklist on the exported video, not only on the storyboard.
- [ ] The opening names one buyer problem.
- [ ] Every material claim has a real interface screen.
- [ ] Every stated action is visible.
- [ ] Every result is held long enough to inspect.
- [ ] Product outcomes are not presented as business outcomes without evidence.
- [ ] Relevant limitations appear where they change interpretation.
- [ ] Narration matches the visible state at that moment.
- [ ] Private data, notifications, and unrelated tabs are absent.
- [ ] Captions remain readable on a phone-sized preview.
- [ ] Motion directs attention without covering the product evidence.
- [ ] Factual approval and visual approval are recorded separately.
- [ ] The final call to action matches the video’s destination.
The last step is to watch once as a skeptical buyer. Pause after every claim and ask, “What did I just see that supports that statement?” If the answer is only an animation, the scene needs more evidence.
Frequently asked questions
1. Should a SaaS demo use real UI or animated mockups?
Use real UI for claims about current product behavior. Animated mockups can explain a concept or preview a planned experience, but label them as concepts. Do not let a mockup imply that an unavailable workflow already exists.
2. How much motion graphics should a product demo include?
Use enough motion to guide attention and explain relationships the interface cannot show by itself. Remove any animation that competes with the action or result. The product evidence should remain the visual anchor.
3. Can screenshots replace a screen recording?
Yes, when the goal is to explain a stable sequence and each screenshot represents a real product state. Add cursor paths or transitions only to clarify the order. Do not animate a screenshot in a way that implies an interaction you did not verify.
4. How long should a SaaS demo video be?
Length should follow the buyer’s question and destination. A single-feature homepage demo can be brief. A sales proof video may need more time for setup, the action, the result, and the relevant boundary. Cut unsupported claims before cutting necessary proof.
5. What should be reviewed before publishing an AI-assisted demo?
Review factual accuracy first, then visual quality. Check every product label, number, screen, action, result, and limitation against an approved source. After facts are frozen, review pacing, focus, captions, and brand presentation.
6. What if the product workflow is not ready to record?
Do not disguise the gap with the generated UI. Choose a concept video, delay the claim, or demonstrate a smaller workflow that can be verified. A narrow honest demo is more useful than a polished video that leaves the central promise unproven.
Make the demo earn belief
To create SaaS demo videos with AI motion graphics, begin with the evidence chain, not the animation menu. Define the buyer question, show the real screen, record the action, reveal the supported result, and state the boundary that matters.
Then use motion to make that chain easier to follow. When every scene has an evidence job, the final video does more than look polished. It gives the buyer a reason to believe the product claim.